miércoles, 24 de abril de 2013

P is for Palm Trees

Hello everybody!!! Aaahhh at last my life has calmed down and hopefully now I can do better nail art! For this letter P challenge (can you believe it? P already) I felt inspired by the beautiful palm trees at sunset and tried to create a similar look doing a gradient. I know it's not the name of a polish or brand, but I really wanted to do these! I hope it counts as 'nail art name'. :D
Let's see how it turned out:


I feel like I should've used brighter colors, but I liked the smoothness of the gradient. I hope you do too. Also please forgive the crappy palm trees!
The colors I used are listed below from lighter to darker:

Silk- Petals Beauty Concept
Salmon & Garfunkel- Catrice
Pink Friday- OPI
Secret Peri-Winkle- China Glaze

I first applied one coat of Silk, and then proceeded to sponge the rest of the colors about three times per nail. Finished off with two coats of Seche Vite.

Thanks for visiting and have a beautiful day :)


P de Palmeras!

Hola a tod@s! Como les va? Para mi afortunadamente ya esta todo tranquilo y espero poder hacer más diseños y más bonitos próximamente!
Increíble como vuela el tiempo y ya estamos en la letra P del reto ABC de Kimber's Lacquer Korner. Para este reto me sentí inspirada por una imagen de palmeras al atardecer e intente recrear la escena en mis uñas.
Los colores que usé son los siguientes en orden de más claro a más oscuro:

Silk- Petals Beauty Concept
Salmon & Garfunkel- Catrice
Pink Friday- OPI
Secret Peri-Winkle- China Glaze

Para lograr este look comencé con una capa de Silk, y después proseguí con el degradado. Esta vez use una técnica diferente.

1. Sobre una bolsa de plástico pinta las líneas de cada color.
2. Con un palillo mezcla los colores en las orillas haciendo circulitos donde termina un color e inicia otro.
3. Humedece una esponja de maquillaje y presiónala contra la pintura en la bolsa.
 
 
4. Aplica la esponja sobre tu uña y muévela ligeramente hacia arriba y hacia abajo para que se mezclen bien los colores.
Tip: No uses más de 4-6 veces el mismo pedazo de esponja porque empezara a desprender pedacitos que se quedarán pegados a tu uña. Ve girando la esponja y pinta en un lugar diferente.
5. Repite varias veces estos pasos hasta lograr la saturación de color que desees.
6. El acabado será mate así que aplica unas dos capas de brillo.

Fácil no? Toma tiempo, pero no es difícil y los resultados te encantarán!
Las palmeras las hice con una pluma de esmalte pero no me gustaron mucho, jeje...nos vemos pronto!


jueves, 18 de abril de 2013

N is for NYX & O is for OPI


Well hello nailistas!!!! This is a double themed post but it wasn't meant to be so, but when I found the convenience in it (that I could catch up with the ABC challenge at last!) I said well whatever! I feel a little like I'm cheating tho... D:.

I really loved this manicure and it's funny cause I was so reluctant to wear the "textured" polishes...These babies have been sitting in my stash for 3 to 4 months!!! I just couldn't wrap my head around not wearing a topcoat. I love topcoat. I think it smooths out any little application mistakes and definitely makes a mani last longer. But so far my mani has survived -almost- intact. Just some tip wear on index and middle finger on my right hand, the rest are OK.
Another fear I had was that they might feel too rough, but to my surprise they're incredibly smooth.
 

For this mani, I did different designs on my left and right hand and I really liked both. I can't choose a favorite.  I started with my beloved basecoat Nail Envy by OPI which continues to amaze me by how strong it's made my nails. Then I applied one-two coats (depending if I messed up or not) of No Place Like Chrome by Essie. When that was totally dry I cut pieces of scotch tape to help me get straight lines to form the triangles in the middle. And the edges whether up or down, right or left, I did by hand with the polish brush, so I had to clean up more tan usual.
It took some time, but I'm so enjoying wearing this mani!

The textured polishes I used are:

NYX- Zoya Pixie Dust
Can't Let Go- OPI Liquid Sand
Get Your Number- OPI Liquid Sand

I can't wait to visit my co-challengers blogs and see what they came up with! :) links are at the bottom!


ESPAÑOL:

Hola chicas y bienvenidas a este post con doble reto! Como ya sabrán ando un poco atrasada y sin querer aquí maté dos pájaros de un tiro. Sabía que iba a usar NYX de Zoya para la "N", pero después se me ocurrió combinarlo con Can't Let Go (el morado) de OPI y pues ya cuando lo estaba sacando vi Get Your Number (azul) y se me ocurrió esto!
 
Comenzé con mi basecoat preferido Nail Envy de OPI que continúa sorprendiéndome de como ha fortalecido mis uñas!. Y ahí les va un tip: en México para conseguir OPI debes ir a las estéticas, atenerte a lo que haya y ser víctima del precio que se les ocurra ponerles, en mi caso he comprado por muy baratos $170 y lo más caro $240 por botella!!...hasta que descubrí esta belleza: Beauty Corner!!! Esta tienda al fin nos ofrece todos los esmaltes de OPI a un buen precio y lo mejor de todo: te envían a toda la república!!! Yo les recomiendo que pidan varios para que el precio del envío no les impacte mucho. Ahora sí no hay pretexto para no tener los tonos más lindos y nuevos!.
 
Y bueno, después continué con No Place Like Chrome de Essie (plateado) aplique de una a dos capas dependiendo si me había quedado horrible la primera o no. Este es un esmalte difícil de aplicar!
Ya que secó, me ayudé de cinta mágica para formar los triángulos centrales y los bordes los hice a mano así que ya se imaginarán como quedaron mis cutículas! Tuve que limpiar más de lo normal.
 
Me encantó como quedo! Hice diferentes diseños en la mano derecha e izquierda y en verdad que no puedo escoger cuál mano me gustó más. Como habrán notado usé varios esmaltes con textura, ya sea que los llamen "Liquid Sand" (Arena Liquida) como OPI o "Pixie Dust" (Polvo de Hada) de Zoya yo estaba algo renuente a usarlos. En primera no podía hacerme a la idea de no usar topcoat. Amo el topcoat. Siento que ayuda mucho a que los errores de aplicación sean menos notorios y DEFINITIVAMENTE hace que el manicure dure más. Otra preocupación que tenía era que se sintieran demasiado rugosos, lo cual no pasó. Son bastante suaves y no dan ninguna sensación diferente a cuando usas un esmalte normal.


Tenía tanto miedo de que no me gustaran, que solo compré la versión "mini"!

 
Por hoy las dejo no se pierdan los demás looks que hicieron mis compañeras en el reto!
 

martes, 9 de abril de 2013

M is for Mi Fantasía and Minted


Hello lovelies!!! Today I'm catching up with Kimber's Lacquer Korner's ABC Challenge! Last wednesday we were supposed to post letter M, and here I am! On the deadline, though!
 
For letter M, I chose Mi Fantasía (the translation is a no-brainer: My Fantasy -duh-) from the Selena Gomez collection for Nicole by OPI and it was part of the birthday gift I received from my BFF Linda (who lives in the States).  I really loved every single polish from this collection, if you want to check it out, here's the link to Karen's blog who's to blame for me wanting this!...And I also chose Minted by Revlon.
 
 
Mi Fantasía is a combination of holographic bar glitters in green and gold, and tiny round glitter in violet-periwinkle in a clear base. I first started with two coats of Minted by Revlon and then I dabbed two coats of Mi Fantasía on the tips for a sort of gradient look.
As most bar glitters, Mi Fantasía is a bit messy to apply :D so I finished off with two coats of Revlon's Colorstay Gelshine Top Coat, which I bought only to give it a try, but it is extremely thin for me. I need a thicker top coat so I guess I won't change my beloved Seche Vite just yet.
 
I hope you like this combination! XOXO!!!
 
Marii


ESPAÑOL:
 
Hola chicas! Me estoy poniendo al corriente con el reto ABC de Kimber's Lacquer Korner al fin con este reto de la letra M, para el cual escogí dos esmaltes: Mi Fantasía de Nicole by OPI y Minted de Revlon.
 
Mi Fantasía contiene una combinación de glitters en barra (verdes y dorados holográficos, si es que mi vista no me engaña) y unos pequeñitos redondos en violeta. Pertenece a la colección de Selena Gómez para Nicole by OPI. Esta colección es una de esas de las que todos los esmaltes me encantaron, desgraciadamente no está disponible en México. Este esmalte fue parte de un gran regalo de cumpleaños de mi mejor amiga Linda que vive en EUA. :) En este link pueden ver swatches de la colección.
 
Para este manicure comencé con dos capas de Minted de Revlon y apliqué solo en las puntas dos capas de un poco de Mi Fantasía. Este último tiene un acabado rugoso así que apliqué dos capas de Colorstay Gelshine Topcoat de Revlon el cual compre para probarlo, pero la verdad es que ya me acostumbré a Seche Vite que es un poco más grueso. Este se me hizo muy delgado, no me gusto.
 
Gracias por leer! Besos y abrazos :)


lunes, 8 de abril de 2013

L is for Lush Lacquer

 
Hello everyone! This letter L challenge has really been a pain in the bottom! I did a mani right on time to post it for the challenge but I didn't love it, so I decided not to post it. Then I did this but I never had the time to write the post, so here I am almost two weeks late but finally nailing this challenge!
 
I chose Lush Lacquer's Birthday Cake which is THE polish that made me fall in love with this brand! It's one of those jelly sandwiches in a bottle, but if you want it to look more like it does on the bottle, then I suggest applying a white base coat and only one coat of Birthday Cake.
 
Lush Lacquer is sold at Etsy, Llarowe, Pshiiit Boutique and more on-line stores because it's an independent brand.
 
These pics are two coats and then two thick coats of topcoat because it is a top coat eater!
Have an awesome week and thanks for reading!!!


ESPAÑOL:

Hola a tod@s!!! Este reto de la letra L cómo me ha dado dolores de cabeza! Ya había hecho un mani con otro esmalte a tiempo para el reto pero no me encanto, así que decidí no publicarlo. Después hice este pero nunca tuve tiempo de escribir el post y pues ni modo casi dos semanas después de lo que debería al fin esta viendo la luz este manicure!! =D

En esta ocasión estoy usando Birthday Cake de Lush Lacquer. Como ya les había comentado, esta marca de esmaltes únicamente se consigue por internet, principalmente en su tienda de Etsy, pero Llarowe, Pshiiit Boutique y otras boutiques de esmaltes en línea también la venden.

Birthday Cake es el esmalte que me hizo enamorarme de Lush Lacquer. Es una base jelly blanca con miles de brillos de todas formas y colores, o sea que es un jelly sándwich ya preparado! jaja
Sí deseas que se vea más como en la botella y no tanto como jelly sándwich entonces aconsejo aplicar una base blanca y solo una capa de Birthday Cake.
 
En estas fotos yo aplique dos capas de Birthday Cake y dos más de top coat porque se lo come! Tiene un acabado bastante rugoso.
 
Les deseo que tengan un excelente inicio de semana y gracias por leer!!


sábado, 30 de marzo de 2013

Rebel Edge Wannabe


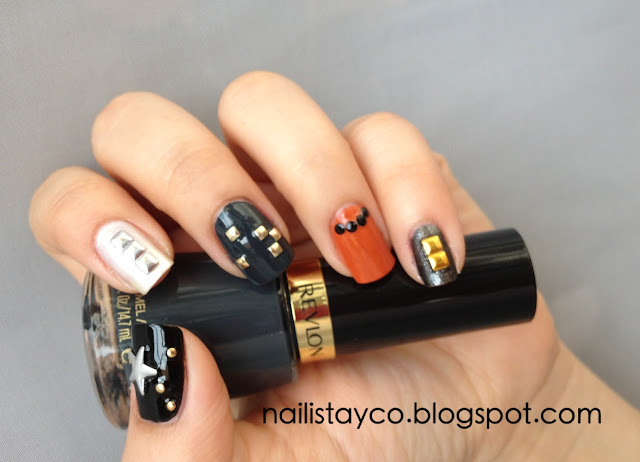
Hey everybody!! Have you heard about The New Black? I've seen their gorgeous and practical kits floating around many blogs, but since I haven't seen this brand in my country (Mexico) I decided to do an imitation inspired by The Rebel Edge Kit by the famous nail artist Christina Rinaldi using stuff that I already had. These are the colors I used, though some are not so close to the ones on the kit!

Black: Black Creme- Wet 'n Wild
Pearly White: Angel Wings- Ciaté
Dark Grey: Iconic- Revlon
Orange: 189- Bissú
Metallic Black: Heels of Steel- Wet n Wild by Fergie


The studs I used are from the Born Pretty Store. This is the first time I've ever bought anything from them and everything went on great! However, I do have a couple things to mention. This store says it has "Worldwide Free Shipping" but that wasn't true for me. It wouldn't let me process my order if I didn't pay $3 dollars of airmail. It's nothing if you think it's coming all the way from Singapore but....wasn't it for free?
 
Also, the size of the studs wheel was a bit disappointing. I thought it was larger and held more product. As you can see on the pics, it's smaller than a bottle of Seche Vite. And..what's with those huge stars? Come on, they're so large and flat that I had to bend them so that they could sit on my nails!
 
Despite this, I was very pleased with the results. The studs only started coming off at the end of day two and they don't cling on to things.
 
What do you think of this look? Would you wear studs on your nails? I hope you're resting and enjoying this long weekend. Hugs and kisses to you all!!!


ESPAÑOL:

Hoooola chicas! Hoy les traigo un look bastante atrevido. Han escuchado o visto sobre la marca The New Black? Bueno yo no se mucho de ella pero si vi que lanzaron unos sets muy lindos de varios "temas". Entre ellos esta el kit Rebel Edge de la nail artist Christina Rinaldi. Me encanto la combinación de los colores que vienen en este kit que junto con los estoperoles hacen un look rockero y "rebelde" muy padre! Peeero, esta marca yo no la he visto aquí en México y la verdad ahora que me propuse tratar de no comprar más esmaltes me he dado cuenta de que puedes intentar duplicar tus looks preferidos con cosas que ya tienes.

Por ejemplo, aquí yo usé los siguientes:

Negro: Black Creme- Wet 'n Wild
Blanco Aperlado: Angel Wings- Ciaté
Gris Oscuro: Iconic- Revlon
Naranja: 189- Bissú
Negro Metálico: Heels of Steel- Wet n Wild by Fergie

Para nada son los mismos tonos del kit, pero me encantó el resultado. Y los estoperoles yo los compre en Born Pretty Store que es una tienda en línea. Si han navegado un poco por los blogs de uñas, deben haber escuchado sobre esta tienda. Mi experiencia con ellos fue muy buena, los productos que encargue llegaron en buen tiempo y estado pero si quisiera comentarles algunas cositas que si me saltaron. Por ejemplo, ellos se anuncian con envío internacional gratis, pero al hacer mi pedido a fuerza me hizo pagar 3 dólares de envío...entonces WTF? jajaja Digo, ya que estas emocionada comprando pues ya es lo de menos y además pensando que vienen desde Singapur pues no es nada! pero entonces...no que era gratis?
 
 
Luego cuando ya vi en persona la ruedita de los estoperoles se me hizo mucho más pequeña de lo que imaginé. Pensé que traía más producto. Como pueden ver en la foto, me cabe perfectamente en la mano y casi casi esta del tamaño de un esmalte! Y las estrellas que onda? están enormes! tuve que doblarlas para que se pudieran acoplar a la forma de mi uña.
 
A pesar de esto, los estoperoles duraron bien por dos días haciendo actividades normales, no se atoran ni nada. Y fue hasta el final del segundo día que ya se empezaron a caer varios. Y solo los pegué con topcoat así que se me hizo bien.
 
Qué les pareció este look? Un poco loco no? Pero muy divertido! eso sí. Espero que estén descansando estos días Santos y aprovechen para hacerse un mani lindo! Besos!!!


These two nails were my favorites!
 
Estas dos uñas fueron mis preferidas!

miércoles, 20 de marzo de 2013

K is for Kimber...of course :)


Hey ladies! Kimber is the name of this awesome pink with gold shimmer polish but also is the name of the lovely lady who started this challenge and put together a great group of nail sisters! She's a devoted blogger, mom and wife :) Her blog is Kimber's Lacquer Korner and there you'll find a huge variety of swatches and most importantly to me, amazing nail art and a great person behind it all. Thanks to her and her challenges I have met even more incredibly nice ladies and she was the first person to ever leave me a comment! :) She holds a special place in my heart, so as a tribute to her, I chose this polish.

Kimber (the polish) has the great formula Zoya's have and it was opaque in two coats. I really loved the application and the smoothness of the finish.
 

I also did what were supposed to be flowers, but I'm not sure if it's clear enough. I tried to do something similar to the flowers by Tenshi No Hana, it's a french blog. I only know a little French, but it's enough to read a couple french blogs I follow. If you haven't visited this blog, you're missing out on an actual nail artist doing her own nails, don't let the language prevent you from doing so. I swear she draws the cutest flowers! .

I'm feeling lazy to list all the polishes I used, but you can find them in the tags! :P But if you're curious about anything just ask me.
See you soon and thanks for reading! xoxo
 

ESPAÑOL:

Hola chicas, como les va en esta semana corta? Hoy les presento a Kimber de Zoya. Kimber es un rosa encendido con shimmer dorado, muy lindo. Tiene una muy buena formula, suave y de buena cobertura. Escogí este esmalte como un tributo a Kimber nuestra host de este reto y su blog Kimber's Lacquer Korner. En ese blog encontrarán a una devota bloguera, mamá y esposa. Cuenta con innumerables swatches de esmaltes independientes y lo más importante para mí, hace un lindísimo nail art y es una gran persona.
 
Ella guarda un lugar especial en mi corazón porque ella hizo el primer comentario en este blog! Y gracias a ella conocí a muchas chicas que han sido super lindas conmigo. :)


En dos dedos hice lo que se supone son unos pedazos de flor. Pero creo que no me salieron muy bien! Me inspiré en las flores que hace Tenshi No Hana es un blog francés de una chica que es artista de uñas profesional, así que ya se imaginaran sus diseños! Estan divinos!!
Yo solo sé un poco de francés, pero me es suficiente para leer unos cuantos blogs que sigo. Pero por favor, no dejen que el idioma las detenga de visitar este blog, no se arrepentirán!

Los esmaltes que utilicé para las "flores" están en las etiquetas (abajo al final) Pero si les queda duda, pregúntenme por favor.
Muchas gracias por leer!! besos y abrazos :)


miércoles, 13 de marzo de 2013

J is for Jade


Hi ladies!!! I didn't know I only have four polishes with a name that starts with a J! ...I have the app to organize the polishes and all but I haven't had the time to do it!

So, I had a hard time looking for a polish for this day of the challenge. I finally went for Jade by Bissú, a local brand. This is a beautiful pastel green and I did a skittle mani using a ton of polishes! Lol! Well, not a ton but the following:
Pastel green: Jade -Bissú
Pastel pink: Rosa Pastel- Bissú
Darker Green: Misty Jade - Rimmel London I Love Lasting Finish
Lilac: Lively Lilac-  Rimmel London I Love Lasting Finish
Aqua Glitter: Glam- Claire's and Nostalgic -LA Girl Glitter Addict.
The tiny studs are by Bedazzle. They are nail stickers actually. And with the glitter I first put on a coat of Glam by Claire's which is a very fine aqua Green glitter and then I sponged on Nostalgic by LA Girl Glitter Addict which is a chunky glitter. I did this because otherwise I would have had to apply like four or five coats and would've ended with a never drying thickness :)
For the lines I used striping tape. 
I'm happy with how it turned out, specially since I had no idea what I was going to do for today's challenge! I don't know why my brain sort of collapses under pressure. Now, I'm thinking jelly sándwich, jigsaw puzzle nail art, etc, etc that I could've done for today!

Left hand / Mano izquierda


Right hand / Mano derecha


Just to prove the name of the polish!


ESPAÑOL:

Hola chicas! Últimamente mi cerebro está como en pausa! jajaja y con este reto no fue la excepción. Tengo mucho sueño todo el día y me siento cansada, tengo una deficiencia de hierro importante debido a un problemilla de salud y ya estoy tomando medicamento y todo, pero aún así no me he sentido muy bien......En fin, espero que mis energías regresen pronto!!!
Para este reto tenía que hacer algo que iniciara con la letra J, pero buscando entre mis esmaltes me di cuenta de que sólo tengo cuatro esmaltes cuyo nombre empieza con J pueden creerlo?! Y bueno pues lo malo es que no tenía nada de ganas de usar ninguno, pero finalmente me decidí por este: Jade de Bissú. Me da mucho gusto ver que Bissú al fin le está poniendo nombres a sus esmaltes bravo!! porque siempre traían nada más unos numeritos.
Sin querer este mani fue hecho con puros esmaltes baratitos ;)...Usé varios, se los nombraré a continuación pero si tienen alguna duda de qué hice en alguna uña o cual esmalte es, pregúntenme y se los explico, puede ser aquí, en Facebook o por correo :)
Verde Pastel: Jade -Bissú
Rosa Pastel: Rosa Pastel- Bissú
Verde más Oscuro: Misty Jade - Rimmel London I Love Lasting Finish
Lila: Lively Lilac-  Rimmel London I Love Lasting Finish
Glitter: Glam- Claire's y Nostalgic -LA Girl Glitter Addict.
Los pequeños estoperoles son de Bedazzle y de hecho son estampas para uña, lo cual hace que aplicarlos sea súper fácil. Para las líneas en los dedos anulares use cintilla. Y con el glitter la cosa estuvo así: aplique una capa de Glam de Claire's que es un glitter muy, muy fino color aqua y después usando una esponja aplique varias veces Nostalgic de LA Girl Glitter Addict, este glitter es más grande pero no tiene tanta cobertura así que para lograr que se viera así hubiera tenido que aplicar unas cuatro capas e iba a terminar con desastre grueso que nunca se iba a secar!

En general me gustó el resultado, siento que la combinación de los colores va bien. Ustedes que creen?

Por hoy las dejo, un beso y mil gracias por leer!