Mostrando entradas con la etiqueta Ciaté. Mostrar todas las entradas

domingo, 22 de diciembre de 2013

Your Present Required de China Glaze


Chicas hermosas!!!! No tengo perdón... tengo el blog abandonado! Una disculpa por eso...la verdad es que ese Instagram me ha hecho mucho mal jejeje....La rapidez con que se maneja me ha conquistado y me avorazo a publicar ahí, antes que acá.
Pero bueno, ya me pongo al corriente, empezando con esta manicura :) Quizá les parezca que la han visto antes....y si! pues me basé completamente en el post de la talentosísima Tere de Nailistas en que uso este conglomerado de glitter hermoso (lo pueden ver aquí) 
Muchas veces es difícil elegir un color de base para los glitter multicolor porque pueden verse opacados o no combinar bien, pero este azul oscuro me parece que es la base perfecta para Your Present Required. Así que no me pude resistir y la tuve que imitar :D


El esmalte que yo elegí de base se llama Power Dressing y es de la marca Ciaté. Apliqué solo una capa y encima puse dos capas más de glitter. Sorprendentemente, este glitter de China Glaze no requiere mas que una capa de top coat.


Esta belleza es parte de la colección Navideña de China Glaze y lo pueden conseguir en Sally Beauty Supply aquí en México.


Volveré pronto con manicuras navideñas, ¡les mando besitos!

viernes, 28 de junio de 2013

Lace and polka dots


Hola a tod@s!!! Al fin es viernes! :D Hoy les tengo un look bien romántico, si por ahí tienen una boda mañana, queda muy bien creo yo. Ya ven que últimamente me ha dado por usar más estos tonos claritos, así que quería probar Cookies and Cream de Ciaté, que venía en el Mini Mani Month, el calendario de adviento que sacaron el año pasado.
Es bastante parecido a Did You 'Ear About Van Gogh? de OPI, solo que C&C es un poquito más claro y la formula es más delgada. A mi parecer el OPI es mejor. Usé dos capas en estas fotos.
 
Hello everyone!!! Fridaaaayyy at laaaaast!!! :D I have a very romantic look for you today. You know how I love this soft colors! I wanted to wear an "almost nude" color so I grabbed my Ciaté Mini Mani Month Calendar and took out Cookies and Cream. This one reminds me a lot of one of my faves Did You 'Ear About Van Gogh? by OPI, they're almost identical only C&C is a tad lighter and OPI's is a whole lot better formula-wise and is also more opaque, this one is a bit thin. I used two coats.


Lo usé así solito unos tres días y después agregué nail art de encaje y lunares usando White On de Sally Hansen Xtreme Wear. Ya saben que eso de dibujar en mis uñas no me sale muy bien así que por favor usen su imaginación un poco!
 
I wore it alone for three days and then did some nail art of lace and polka dots using White On by Sally Hansen Xtreme Wear...you know I suck at drawing in my nails so please, bear with me. It's not the best lace but you get the idea!


Quería atenuar el blanco un poco así que apliqué encima una capa de Cotton Candy At Eiffel Tower de Catrice. Es de esos cremitas que se usan en el manicure francés.

I wanted to soften the white a bit, so I applied a coat of Cotton Candy At Eiffel Tower by Catrice. This is one of those sheer polishes that are used for french manicure.

 
*Suspiros*
A poco no se ve lindo?
Le envié una foto a mi amiga Karla y me sugirió agregarle moños y dije oh no más dibujos?! pero pues los hice, disculpen ya saben, no quedaron muy bien! Usé Salmon & Garfunkel by Catrice.
 
*Sigh*...Doesn't it look cute?! *sigh again*...
Then I sent the pic to my friend Karla and she suggested I added bows. I thought, oh no, more drawing? But I did it. Again, forgive the messy bows! (did 'em with Salmon & Garfunkel by Catrice)
 
 
Aquí les comparto como hice el encaje:
In case you're absolutely clueless on how to do a lace pattern (like me), I did this:


Gracias por leer! Lindo fin de semana!
Thanks for reading, have a nice weekend!

domingo, 28 de abril de 2013

Cheshire, by CrowsToes

Hello nailistas! Happy Sunday! Today I'm going to show you a very special polish. You know why? Because I won it! Unbelievable but true. A couple months ago Lariesa from Me, Myself and Polish hosted a giveaway because she achieved to get 100 GFC followers...of course now she has doubled that amount (Congrats!), that's how late this post is :\
I ended up winning the first prize a $25 gift certificate from Llarowe!!! (it was going to be from Etsy, but Lariesa had some issues and we agreed to change it) Of course I couldn't wait to start shopping, so I browsed all over the store and picked two gorgeous babies (like you could pick an ugly polish at Llarowe! ha!)
This is the first one, Cheshire by CrowsToes. It's a clear based purple glitter bomb as you can see! I chose to layer it over a deep blue base, Power Dressing by Ciaté.


As best described by the creator:
 
I have always loved the cheshire cat. A big chunky feline with that cryptic half crazed look in his bright yellow eyes coupled with a huge teethy grin AND purple and magenta stripes? I mean., how could anyone NOT love a cat like that???
Cheshire is a combination of purple, magenta, & chartreuse glitters in a clear base, combined with a little crazy cat magic just for good measure. :)
 
What do you think? Don't you just love it?! I adored it. It shines and sparkles so so much! Can you see the little aqua glitters? It has so much depth!...And this is just one coat. So if you wanted to apply it on its own you totally could. And I also love the Cheshire Cat :)
I'll show you a shot of the base color so you can see what it looks like:

I had to use a Flash, it looked black otherwise!
I will show you the other polish I chose from the prize on another post coming soon :P I can only tell you that it's a dupe of a very popular polish not available in my country....


ESPAÑOL:
 
Hola nailistas! Feliz domingo! Hoy les presento un esmalte muy especial. Saben por qué? Porque me lo gané! Increíble, es la primera vez que me gano algo que disfruto jijiji. Hace un par de meses Lariesa del blog Me, Myself and Polish tuvo un sorteo celebrando haber llegado a 100 seguidores de Google Friend Connect...claro que ya hasta duplicó esa cantidad...así de atrasado está este post!
 
Bueno pues tuve la super suerte de ganar el primer premio: un certificado de regalo de $25 dólares en Llarowe (originalmente era de Etsy pero ella tuvo unos cuantos problemitas y decidimos cambiarlo). Por supuesto que no pude esperar para usarlo y casi inmediatamente hice un pedido. Este es el primero que elegí: Cheshire de CrowsToes.
 
 
Aquí les dejo la descripción de Cheshire según su creador:
 
Siempre he amado al gato Cheshire. Un gran felino regordete con esa mirada extraña un tanto loca en sus brillantes ojos amarillos junto con una sonrisa de enormes dientes Y rayas moradas y magentas? Digo, como podría alguien NO amar un gato así???
Cheshire es una combinación de glitters morados, magenta y dorados en una base transparente, combinados con un poco de magia de gato loco para equilibrar todo :)
 
 
Qué les parece? A poco no les encanta? Brilla muchísimo y los diferentes glitters que contiene de distintos tamaños y colores le dan muchísima profundidad. Yo lo apliqué sobre Power Dressing de Ciaté un azul profundo, se muestra en la foto de abajo. Pero si lo quisieras usar solo también se puede ya que esta super cargado de brillos, yo apliqué solo UNA capa!


El otro esmalte que elegí se los mostraré en otro post! Solo les puedo adelantar que es un duplicado de un esmalte muy popular en internet y que no esta disponible en México...

Gracias por visitar y hasta la próxima!

sábado, 30 de marzo de 2013

Rebel Edge Wannabe


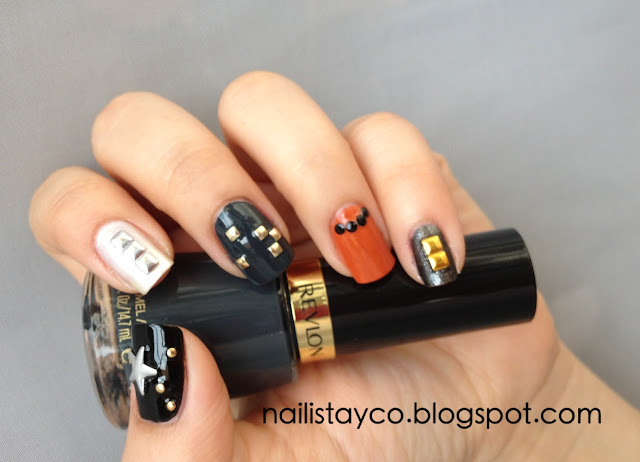
Hey everybody!! Have you heard about The New Black? I've seen their gorgeous and practical kits floating around many blogs, but since I haven't seen this brand in my country (Mexico) I decided to do an imitation inspired by The Rebel Edge Kit by the famous nail artist Christina Rinaldi using stuff that I already had. These are the colors I used, though some are not so close to the ones on the kit!

Black: Black Creme- Wet 'n Wild
Pearly White: Angel Wings- Ciaté
Dark Grey: Iconic- Revlon
Orange: 189- Bissú
Metallic Black: Heels of Steel- Wet n Wild by Fergie


The studs I used are from the Born Pretty Store. This is the first time I've ever bought anything from them and everything went on great! However, I do have a couple things to mention. This store says it has "Worldwide Free Shipping" but that wasn't true for me. It wouldn't let me process my order if I didn't pay $3 dollars of airmail. It's nothing if you think it's coming all the way from Singapore but....wasn't it for free?
 
Also, the size of the studs wheel was a bit disappointing. I thought it was larger and held more product. As you can see on the pics, it's smaller than a bottle of Seche Vite. And..what's with those huge stars? Come on, they're so large and flat that I had to bend them so that they could sit on my nails!
 
Despite this, I was very pleased with the results. The studs only started coming off at the end of day two and they don't cling on to things.
 
What do you think of this look? Would you wear studs on your nails? I hope you're resting and enjoying this long weekend. Hugs and kisses to you all!!!


ESPAÑOL:

Hoooola chicas! Hoy les traigo un look bastante atrevido. Han escuchado o visto sobre la marca The New Black? Bueno yo no se mucho de ella pero si vi que lanzaron unos sets muy lindos de varios "temas". Entre ellos esta el kit Rebel Edge de la nail artist Christina Rinaldi. Me encanto la combinación de los colores que vienen en este kit que junto con los estoperoles hacen un look rockero y "rebelde" muy padre! Peeero, esta marca yo no la he visto aquí en México y la verdad ahora que me propuse tratar de no comprar más esmaltes me he dado cuenta de que puedes intentar duplicar tus looks preferidos con cosas que ya tienes.

Por ejemplo, aquí yo usé los siguientes:

Negro: Black Creme- Wet 'n Wild
Blanco Aperlado: Angel Wings- Ciaté
Gris Oscuro: Iconic- Revlon
Naranja: 189- Bissú
Negro Metálico: Heels of Steel- Wet n Wild by Fergie

Para nada son los mismos tonos del kit, pero me encantó el resultado. Y los estoperoles yo los compre en Born Pretty Store que es una tienda en línea. Si han navegado un poco por los blogs de uñas, deben haber escuchado sobre esta tienda. Mi experiencia con ellos fue muy buena, los productos que encargue llegaron en buen tiempo y estado pero si quisiera comentarles algunas cositas que si me saltaron. Por ejemplo, ellos se anuncian con envío internacional gratis, pero al hacer mi pedido a fuerza me hizo pagar 3 dólares de envío...entonces WTF? jajaja Digo, ya que estas emocionada comprando pues ya es lo de menos y además pensando que vienen desde Singapur pues no es nada! pero entonces...no que era gratis?
 
 
Luego cuando ya vi en persona la ruedita de los estoperoles se me hizo mucho más pequeña de lo que imaginé. Pensé que traía más producto. Como pueden ver en la foto, me cabe perfectamente en la mano y casi casi esta del tamaño de un esmalte! Y las estrellas que onda? están enormes! tuve que doblarlas para que se pudieran acoplar a la forma de mi uña.
 
A pesar de esto, los estoperoles duraron bien por dos días haciendo actividades normales, no se atoran ni nada. Y fue hasta el final del segundo día que ya se empezaron a caer varios. Y solo los pegué con topcoat así que se me hizo bien.
 
Qué les pareció este look? Un poco loco no? Pero muy divertido! eso sí. Espero que estén descansando estos días Santos y aprovechen para hacerse un mani lindo! Besos!!!


These two nails were my favorites!
 
Estas dos uñas fueron mis preferidas!

domingo, 27 de enero de 2013

Lavender Sparkle


Hi dolls! Today is my birthday! I'm turning 30!! I'm a little bit overwhelmed!...but well, let's talk nails and polishes!
The last time I travelled I got this OPI polish at the duty free, but I must admit I have been very disappointed by it. It's name? It's Totally Fort-Worth It (ironic, huh? cause it's totally not!) it is from the Texas 2011 collection. It will catch your eye, just look at the bottle:


It appears to be a cute grey-lavender with pink shimmer...and it is. The problem is that you can't ever reach full opacity with this one, it is so absolutely TRANSPARENT!
So, to make this work I had to wear undies...I used Catrice's Sing: Hey Dirty Lilah!, two coats. This polish looks totally grey on the bottle. I was actually taken back when I read the name, but yep, on the nail it does look lilac. Here's a pic so you can see it on the nails. I am soo loving this polish!!!


And then the Fort-Worth it...I only applied one coat. It made my nails super shiny and the pink shimmer was there, but barely. Then I sponged the tips with Be-Jewelled by Sally Hansen Gem Crush.
On the ring finger of my left hand I did an accent nail with a tiny crown. I tried stamping one but I just couldn't. So I drew it, even though I suck at it! I used Cabaret by Ciaté and these little "nail diamonds". I hope you liked it! Enjoy your sunday :)
ESPAÑOL:
Hola muñecas! Hoy es mi cumpleeee! Cumplo 30 :O ... un poco abrumada por eso, pero bueno...a lo que voy! La ultima vez que viaje compré en el duty-free este esmalte de OPI llamado It's Totally Fort-Worth It (es un juego de palabras pero quiere decir que Vale Totalmente la Pena!) un nombre bastante irónico porque para mi fue una total decepción. En la botella se ve super lindo como un lavanda grisáceo con iridiscente rosado y sí lo es, pero también es super, hiper, mega...transparente. Jamás lograrás cobertura total con él.
En fin, pues entonces puse dos capas de Sing: Hey Dirty Lilah! de Catrice debajo de una capa de It's Totally Fort-Worth It, le dió mucho brillo y la iridiscencia rosada se noto pero muy, muy poco.
Encima de esto puse Be-Jewelled de Sally Hansen Gem Crush en las puntas con una esponja. En mi mano izquierda hice una accent nail en el dedo anular pintando una coronita, me quedó bastante mal pero bueno jijiji ;P
Espero les haya gustado, disfruten su domingo! :)


miércoles, 23 de enero de 2013

C is for Caviar Pearls & Chevron Mani!


Hi dear ladies!! Today's challenge is for the letter C! I had wanted to do a chevron manicure ever since I saw Kimber's post for the 31 day challenge's red nails. I hadn't done it because for me, tape manis are a real P.I.T.A!!! but the results are awesome.

I started with my basecoat Nail Envy by OPI, then applied two coats of Revlon's Rich Raspberry and a coat of Seche Vite.
When that was dry, I placed the tape to form the chevron and then applied a coat of LA Colors Color Craze Lush Lavendar and took off the tape almost right away. After that I didn't feel like using tape again, so I did the blue part by hand. It's George Blueney by Catrice. (LOL! Love the name!). And finally the Seche Vite, again.

The accent nails have caviar pearls instead. These are called Prom Queen by Ciaté and I outlined them with striping tape. I flooded them with Seche Vite on top because I've heard these tend to fall off quite fast so... let's see how long they survive it's my first time using them...I will update that info later. ;)


ESPAÑOL:

Hola chicas! El reto de hoy es con la letra "C" de Caviar y Chevrón!. Caviar porque así se les llama a las mini perlitas que tengo en mi dedo anular y chevrón por el símbolo que hice en las uñas, yo no sabía qué significaba esta palabra así que le inserte un link por si acaso ustedes tambien tienen la duda.

Bueno al grano!...Empecé con mi basecoat Nail Envy de OPI, dos capas de Rich Raspberry de Revlon y una capa de Seche Vite para acelerar un poco el proceso. Ya que se secó, puse la cinta adhesiva y una capa de Lush Lavendar de LA Colors Color Craze. Para la parte azul ya me dio flojera volver a poner la cinta así que lo hice a mano. El tono es George Blueney de Catrice (no les encanta el nombre? es como George Clooney!!! jajaja)

Respecto a las perlitas de caviar...pues es de esas cosas que tengo varias y nada más no las había usado!!! Es la primera vez, así que me va a faltar contarles las experiencia. Por esta vez lo único que cambié fue que las inundé en topcoat! En el instructivo no dice que lo hagas pero una amiga me dijo que si no les pones topcoat se caen muy rápido. Peeeero también importa qué topcoat uses, en una mano usé Seche Vite y no tuve problema pero en la otra mano usé Clearly Quick de Sally Hansen Insta-Dri y se corrió el color de las perlitas :(

Les debo la actualizacion para ver cuánto tiempo me duran ;)

 
Let's go and check out all the other ladies manicures!

miércoles, 9 de enero de 2013

A is for Angel Wings


Hello ladies!!! Yay today is the first day of the ABC Challenge that Kimber from Kimber's Lacquer Corner is hosting! :) I am so excited to begin a new challenge with a lot of the girls that were in the past 31 Day Challenge and a bunch of new girls as well! :D more talent to see hooray!
If you want to join us you can do it anytime, everybody's welcome!

So today we begin with the letter A obviously, and I chose Angel Wings by Ciaté. I got this polish in the Mini Mani Month. It is a metallic, pearly white...very sweet and innocent shade. It reminds me of a wedding dress. It is quite sheer, I applied four thin coats and you can still see the nail line, but it's ok to me.
 
 
As you probably know, these shimmery metallic polishes are hard to apply because they tend to reveal every streak and mistake you make so you have to be extra careful with the application here.
Then I applied these tiny white studs I've had for years and did some sort of a french tip. The studs are holographic but it doesn't show on the photos.
 
I really liked the result and this color had me thinking it could be a nice option for a bride's manicure...so I got a little crazy and took a few pictures with my rings ;P


ESPAÑOL:

Hola, hola chicas! Les cuento q estoy en un nuevo reto, este se llama Reto ABC y consiste en hacer un manicure cada miércoles con un esmalte cuyo nombre, marca o técnica del nail art comience con la letra del abecedario en turno. Todo el mundo es bienvenido asi que si se nos quieren unir, adelante!

Hoy iniciamos con la A de Angel Wings de Ciaté. Es un blanco metálico- aperlado muy dulce e inocente. Me recuerda a un vestido de novia. :P Es bastante traslúcido, aplique 4 capas delgadas y aún se pueden ver mis uñas pero me gusta. Como siempre estos tonos aperlados-nacarados son difíciles de aplicar porque tienden a mostrar cada defecto de los brochazos y las uñas, así que hay q ser muy cuidadosas al aplicarlo.


Después se me ocurrió ponerle estas tachuelitas blancas que tengo desde hace ya bastante tiempo y crear una punta francesa con ellas. Me gustó muchísimo el resultado, se me hizo súper romántico e ideal para una novia en el día de su boda, así que me aloqué un poco y tomé unas fotos con anillos ;P jeje


Let's go and check out what the other girls did for the challenge!


lunes, 31 de diciembre de 2012

Black Gold to Say Bye-Bye to 2012!


Hello nailistas!!! Officially we're on the last hours of the year!!! So this is my last mani of the year as well. ^.^
 
Lately I've seen this quilted nails technique everywhere! And I think it is really cute, so I grabbed my Ciaté Mini 'paint pots' and got to work. It didn't take as long as I thought and it was pretty easy. I did a pictorial to show you how I did it
 
1. First of all you must choose your base colors. I used Twilight and on my ring finger Ladylike Luxe both by Ciaté. 
 
2 & 3. Then you stick the striping tape and do the gradient like you normally would.
 
4. Take off the tape to reveal your quilted nails!

 
Now on to the finishing touch, the 'caviar pearls' (I used Bumble Bee by Ciaté). I took a tiny plastic recipient and poured a few. Then I applied a coat of clear nail polish to make the surface 'sticky' and then some more on to the dotting tool to pick up the pearls. And that's it! Really quick right?


Now you would think if it is so fast and easy why didn't I do all the nails right?...well, I was lazy to cut a gazillion pieces of striping tape! Besides I really like the way they turned out. I did a simple gradient on my thumb and middle finger. But I realized that when I applied Ladylike Luxe over Twilight it didn't look as yellow, it looked more silver-y, so I picked up West End Wonderland by Butter London to do the gradient instead.
I hope you liked it as much as I did and try it too, you can use any colors you like!
 
Thank you so much for coming over, my best wishes for the new year 2013, may all your dreams come true! :D
 
P.S. All the Ciaté mini polishes are from the Ciaté Mini Mani Month advent calendar.


ESPAÑOL:

Hola nailistas!! Este es oficialmente el ultimo mani que haré este año jejeje... Ultimamente he visto esta técnica de "uñas acolchadas" en todas partes así que agarré mi mini calendario de Ciaté y decidí intentarlo. Hice un pictorial para mostrarles como lo hice.
 
1. Primero elige tus colores base yo usé Twilight y en mi dedo anular usé Ladylike Luxe ambos de Ciaté.
2 & 3. Pega la cintilla para formar el acolchado y haz el degradado con la esponja como lo harías normalmente.
 
4. El degradado seca casi al instante así que no debes esperar mucho. Retira la cintilla para revelar tu manicure acolchado!


Ahora el toque final las 'perlas de caviar' (Yo usé Bumble Bee de Ciaté). Tomé un pequeño recipiente y vacié ahí algunas. Aplique una capa de barniz transparente para hacer la superficie 'pegajosa' y tambien le puse tantito a mi palillo con el que recogí las perlitas para pegarlas en la uña. Y eso es todo! Bastante rápido verdad?
 
No hice todas las uñas así porque me dió flojera cortar y cortar pedacitos de cinta ;P pero me gustó muchisimo como quedó. En mi dedo medio y pulgar hice un degradado normal con dorado pero usé West End Wonderland  en lugar de Ladylike Luxe porque al poner este último sobre Twilight se veía más plateado.
 
Espero les haya gustado tanto como a mí y que lo intenten hacer.
 
Muchísimas gracias por visitar mi blog, mis mejores deseos para este año nuevo 2013, que la paz, salud y amor reinen en sus hogares hoy y siempre.
 
Muchos besos!!xx
 
Marii
 
PD: Todos los mini esmaltes de Ciaté son del calendario de adviento Ciaté Mini Mani Month.

miércoles, 19 de diciembre de 2012

Rudolph And His Red Nose!

 
Well hello nailistas!! ...It's been more than a week since my last post, I was so busy last week! But here I am.
I wanted to do a reindeer so badly, and I finally found the courage and the time! I did a small pictorial. They don't look perfect, but they are so cute and maybe you can make them better. I used the smallest nail art brush and for the black outline I used a nail art pen in black.


ESPAÑOL:
Hola chicas! wow ahora si que me tarde verdad? ups! Estuve muy ocupada la semana pasada y no me dieron ni ganas ni tiempo de hacerme mis uñas. Pero ya volví!
Estoy feliz porque tuve una navidad prematura! Hace dos semanas llegaron todos mis encargos de esmaltes y no puedo esperar a mostrarles todo! pero poco a poco iran viendo las nuevas adquisiciones ;)

Por ahora les explico como hice este reno no perfecto pero muy tierno.
1. Primero pinte la base con Da Bush de Essie, despues con Case Study tambien de Essie dibuje el cuerpo del reno.
2. Dibuje los ojitos con LA Colors Art Deco en White.
3. La nariz roja la pinte con Enchanted Rose de Ciaté (siiii les presumo que ya tengo mi calendario de adviento de Ciaté y esta increíble, =D no me canso de verlo chequenlo aquí)
4. Con un stilografo negro dibujé los ojitos y el contorno del reno.
5. Finalmente los cuernos los hice con Espresso de Revlon un café muy oscuro y el pincelito.


Cuando terminé los renos agregué puntitos blancos simulando nieve, si alcanzan a ver unos brillitos por ahi es porque le pasé una capa de Rock Candy de Sally Hansen Hard as Nails.


Ah! Y se me olvidaba que les queria enseñar estas que le hice a mi cuñada, son muy similares a las del renito solo cambian los colores;